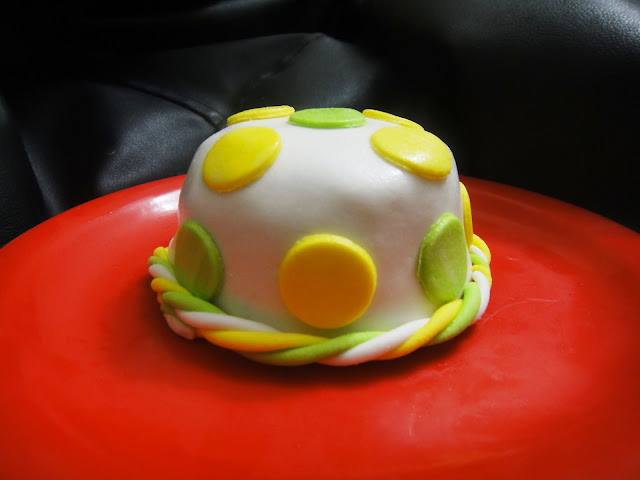
I've always been fascinated with fondant. A white blanket that swaddles cakes of all sizes, making everything look as pretty as a snow covered garden. However, fondant isn't available off the shelves here and the lazy me always thought it was too much effort to make it from scratch. After watching a week's worth of Fabulous Cakes on TLC, I took the bull by its horns and decided it was time to attack the beast.
The lazy bug in me, decided to go in for the easier to make marshmallow fondant vs the more authentic but long process of making fondant using glucose, gelatin, corn syrup and what not. All I needed for this recipe was marshmallows and icing sugar. If you live in India, you know that marshmallows, aren't available off the shelf, so after hunting away at Spencers, Spar and other haunts, eureka, it hit me, Sweet World at popular malls here sells marshmallows. So off I went to their store, the only grown up 'kid' nevertheless, asking the bewildered attendant for only white marshmallows from the pink and white lot. He must have surely thought I'd lost it. After all, for a person eating marshmallows, it hardly matters what colour it is, does it? Regardless, I stood there while he picked and chose the white ones and a happy puppy I was, anticipating the pretty fondant patterns in my head.
Armed with my bag of marshmallows, I set to experiment and much to the amusement of my two cats, I did a happy dance in the kitchen when I finally achieved success. So here's the recipe for fondant and the mini princess cakes..
Polka Dot Princess Cakes
For the fondant, you will need:
100 grams white marshmallows
1 tablespoon water
3 cups Icing sugar (confectioners sugar)
A few drops of glycerin
Method:
Place the Marshmallows in a large microwavable bowl, ensuring that there's enough space for the marshmallows to rise when they heat up. They often double up in volume when heating up. Add the water and heat them in your microwave for a minute. Take them out, even though they look puffed but not melted, they are. Use a silicone spatula and mix them so that all the water is incorporated. Give it a good whisk till all the bits and pieces are melted well. Add in a cup of icing sugar and begin to mix. The marshmallow mixture will slowly adhere to the icing sugar and it will soon thicken, starting to get harder to mix. After most of it has been incorporated, dust your work surface with icing sugar, put the mixture on it and adding the rest of the icing sugar gradually, begin to knead everything together. The mixture will be extremely sticky at this stage, but it will get better as you knead it in with the rest of the icing sugar. As a rule of thumb, do not add all the icing sugar, making sure to gradually add in only how much is necessary. You might need more or lesser than what the recipe calls for based on the humidity levels in your location. If your dough is too wet, add more icing sugar and if its too dry, add a few drops of water at a time and knead it again. It also helps to knead in a couple of drops of glycerin just to aid the softness of the dough. When the dough isn't sticky anymore, roll it into a ball, cover with cling film twice and store on your counter top if using it within a day or two (depending on how cool the weather is) or store it in your fridge, getting the dough to room temperature before kneading and rolling it.
For the cakes, head to my senior from college, Aparna's website for this super easy egg-less microwave cake - Apycooking.
I used 3 small bowls instead of one big bowl and substituted the vanilla essence for peppermint essence, my fav.
For the Buttercream frosting you will need:
150 grams unsalted butter (softened)
1 cup icing sugar
2 plus 1 tablespoons milk
1 teaspoon vanilla essence
Method:
Whisk the butter, icing sugar, essence and 1 teaspoon milk till it is smooth. Keep aside 3 to 4 spoonfuls of the frosting in another bowl, add the rest of the milk to this mixture to make a thinner frosting, you will need this for the crumb coating of the cake. Once the mini cakes have cooled completely, slice them into halves and fill them with the thick buttercream icing and sandwiching them back together.
 |
| Buttercream-filled cake |
 |
| Crumb-coated cake |
 |
| Snow white wrapped in fondant |
As you can see, the base isn't the neatest at times, so decorating them is necessary. You can decorate them with small balls of different colours if you like. A word of caution, this is tedious if you are doing this alone. Luckily, I had hubby walk in from work at this opportune moment and I dragged him into the kitchen to help me with them :p. Don't worry if they are all not even in size, they are too small to be judged by a perfectionist's eyes :)
Or you can roll out strips of different colours, place them in a row and then twirl them together to get this twisted fondant pattern and attach them to the base with a little water:
There you have it, a perfectly decorated set of mini cakes to make any day special. Two people can easily polish off these mini cakes, but if you do want to store them, do so in an airtight container. But be warned, these babies won't last long, especially if you have kids at home or a sweet tooth like me :)


Welcome to the world of blogging!! Thanks for choosing a recipe from my blog. The cakes look cute and cuddly!!
ReplyDeleteThanks apy :)
ReplyDelete:)
ReplyDelete