Nothing gets me going like a good recipe and a new dish to bake. The planning, the excitement when the dish looks like its working out, the joy of seeing my family and friends gobble it up and eagerly looking forward to what I can bake next, everything about baking makes me happy (the messy kitchen counter top aside :p) Here's a peek into my kitchen, my cooking, my wonderland.


Monday, 29 August 2011

Just drool

Choco ganache cake with edible glitter
A few weeks ago, I got my first 'official' cake order and I was over the moon. Chalked up the cakes and planned the design and set out with such enthusiasm that it got the better of me. Cut short to eight hours of non stop baking, piping, cutting and what not and lil me is knocked out puking and almost fainting. Lesson learned: Don't skip meals in enthusiasm, nivi ain't superwoman :p
     I was mighty pleased with the result and i'm surprised I took this long to post it. Recipes were gonna follow suit, but I'm listening to my good friend who said 'Don't share these recipes, just put up pics'. So I'm just gonna make you guys drool and keep the recipes on hold this time. If you guys want the recipes, gimme a shout out and I shall oblige :)
Layered choco cake with a peppermint cream filling

Easy peasy choco balls


There are days when measuring, mixing, baking just don't do it. If an easy choco fix is what you are looking for, look no further. My fudgy choco balls can be made in about ten minutes, give or take, and can be devoured instantly if you can bear a scalded tongue, or be left to cool and gobbled up, for gobbled up they will be. Trust me, they wont last long. No one believes that they are super easy to make and this dessert has been shared over and over again, with many asking for the recipe, so here it is. 


Easy peasy choco balls
For the choco balls, you will need:
1 can condensed milk
1/2 cup of cocoa powder
1 teaspoon unsalted butter for rolling the balls


Start off by heating the condensed milk in a heavy bottomed pan. Keep the flame on low and keep stirring till it bubbles up. Be sure to scrape the edges often as condensed milk can burn quickly on heat if not stirred well. After about four to five minutes you shall notice the condensed milk thickening up a bit. Add in your cocoa powder (you can add more or less depending on how chocolatey you want it) and keep stirring till it coats the back of your spoon. After about four to five more minutes, take it off the heat. The mixture will look liquidy, but don't worry, it will set. Pour the mixture on a plate and let it cool. You can also keep it in the fridge if you are impatient. Once it is cooled, it will harden up a bit. This is when you can start rolling it into balls. Coat your hands with some butter, drop spoonfuls of the mixture into your palm and roll. Top off with an m&m on each ball and you are done.  

Tuesday, 23 August 2011

Happy Birthday Wuffie

Last year, around this time, I was beaming with joy as I had just spent a day with my very own puddytat, Wuffie. An adorable white fluff ball, he stole my heart the minute I set my eyes on him. He has an almost angelic quality about him, what with everyone saying he has angel eyes :) New beginnings were in order not just for me with the new home, marriage and the rest, but for him too with a new home. Ah how I waited to bring him home, carried the tiny fluff ball in my hands and promised to keep him happy. 
     He slept with me and stuck by my side for the first few days. He was my poonch (tail) like Ma would say. Where ever I turned I would find him in the house and he has been a big part of my kitchen (no, he wouldn't cook with me :p ), but would always lie down on a box in the kitchen while I would cook and bake. Just having him around made my day and I would sing and cook with him as company in the kitchen, although he had his 'I hate the kitchen' moments too, thanks to my new hob. He would always be on my shoulders, loving the view from the top :) One day, as I was cooking he came and rubbed his head against my legs, signalling a pick me up command. Off he came on my shoulder. I put the hob on to take away the cooking smells and boom, he scratched me and jumped away in horror, wondering what that monstrous sound was. One day later, however, he was back to his box in the kitchen looking at me pottering away.       
     Apart from baking and cooking, Wuffie (He was white and fluffy, so he got christened Wuffie) has been my pride and joy and to celebrate his birthday (the day we got him home technically) I baked, what else but cupcakes, two mini ones. You can use any recipe for the cupcakes, I used the leftover batter from a marble cake (coming up in another post). I tried a new piping technique (basket weave) I learnt and I must say, I'm mighty pleased with the result (Pic no 1 at the beginning of the post). A tutorial on the extremely simple and great looking piping technique will be coming up shortly. For the second one (the white one) I simply used a star tip and piped dots of it so to say, all over the cupcake.


Wuffie got a dab of icing that he licked off in delight and had a teeny bit of the cake and was one happy cat :) 


Happy Birthday my fur ball.
   
Wuffie, the week we got him home


Tuesday, 16 August 2011

Spuds at their best

All things sweet might seem like my cup of tea, but I love all things salty too. Ask my mom! my best friend and I, as children (I still do and I'm sure she does too :p ) would sprinkle salt on anything and when it came to lime and salt on raw mangoes, yummm, the more the better, with a dollop of chilli powder for good measure. Anyways, I've digressed enough already :p . Point of the matter is, if cakes are not your thing, don't fret, I have something savory coming right up. Just tried this dish for a light dinner a few hours ago and encouragement from hubby made me want to share it with you guys, however simple it may be. 


Baked potatoes topped with a mint yoghurt dressing and a side of pea and corn salad (serves 2)


For the potatoes you will need:
4 to 5 potatoes
2 teaspoons paprika
1 teaspoon salt
2 teaspoons mixed herb seasoning (Any off the shelf mixed herb seasonings will do. If you don't have this, just mix some dried herbs - oregano, red chilli flakes, basil and thyme together)
2 tablespoons olive oil
1/2 teaspoon pepper
1 pod garlic, slightly smashed


For the salad you will need:
100 grams frozen sweet corn
100 grans frozen peas
1 teaspoon salted butter
1 teaspoon pepper
Juice of half a lemon


For the mint yoghurt dressing you will need: 
4 tablespoons yoghurt
a pinch of salt
a pinch of paprika
a few sprigs of mint leaves chopped


Method:
Wash the potatoes thoroughly, making sure all the grime is off. Cut them into random-sized chunks. Drizzle your baking dish with olive oil, drop in the potatoes and sprinkle salt, pepper, paprika, herb seasonings and the lightly smashed garlic pod (with the skin on). Pop them into a preheated oven (210 C) and bake for 30 minutes. 
     While the potatoes are baking, you can get started with the salad. Simply boil the sweet corn kernels in water till they are tender and drain. This hardly takes 2 to 3 minutes. Repeat the process with the peas and pop them all in a bowl. Add the butter, salt, pepper and lime juice and mix till all the corn and peas are coated in the glossy butter and serve. For the yoghurt dressing, simply mix all the ingredients and pour it into a serving bowl. 


     Toss the potatoes after about 20 minutes of baking to ensure even baking and continue to bake them. After 30 minutes of baking, grill the potatoes for another 5 to 10 minutes so that the tops are browned. Serve the potatoes with the bits of the crunchy baked garlic (I love garlic, but if you aren't that fond of it, toss them away before serving). Drizzle the yoghurt dressing over the potatoes and serve. 


Death By Chocolate

I started off with a bang and then disappeared for a while. Can't blame a gal for being under the weather, can you? The long weekend didn't help either :p
     While the country was celebrating Independence day, our family was also celebrating a b'day and lil ol me couldn't pass up an opportunity to bake. I wanted to try out something new this time and a bar of dark chocolate sitting pretty in my kitchen beckoned. Chocolate ganache was something I've been lusting after, so I thought why not? Shopped for some cream and I was set. And since I was going for chocolate, I decided to go all out and make the cake all about chocolate, thus the name. Anything in excess is bad, yes. But when it comes to chocolate, it's all goood :) I got this recipe from my go to blog for desserts: Rias collection. I modified it a bit but the base is all her recipe and I must say, it is one of my favourites. 


Death by chocolate


For the cake, you will need:
3/4th cup flour
1/4th cup cocoa powder
50 grams milk chocolate (melted)
120 grams cooking butter (I used the slightly salted variety)
1 cup plus 2 heaped tablespoons demerara sugar
2 eggs
1 teaspoon baking soda
3 tablespoons hot water
1 tablespoon vanilla essence


For the ganache and flakes you will need:
110 grams dark chocolate
100 grams heavy whipping cream (cream with a thick fat content)
3 tablespoons unsalted butter


Method:
Start by preheating your oven to 180 C. Get your cake batter started by softening your butter. Mix it thoroughly in a bowl till it is smooth. A quick trick is to heat the butter in the microwave till it is soft to jump start your mixing process. Once it is smooth, add in the sugar and mix. Don't worry if the mixture is not all smooth, the demerara sugar adds a nice crunch to the cake. Add in your eggs one at a time, beating with each addition. Add in the vanilla essence and your melted chocolate and mix well. 
     Sift your flour and cocoa powder and add it to your wet mixture. If you are using unsalted butter, add half a teaspoon of salt to your mixture now. After it is all incorporated, add your baking soda to the hot water, mix it and stir it into the cake batter. If your batter is too thick, add more water till you get a thick flowy consistency, not globs of batter dropping off your spoon. 
     Lightly grease your baking tin (I used a 20x20 cm square dish) with butter. I often use leftover butter wrappers as they are much easier to scrub the insides of your pan with, rather than using your fingers and getting them sticky. Makes good use of the little butter left on the wrappers too. Pour your batter into the baking tin and bake for about 30 to 40 minutes or  till a toothpick inserted into the center of the cake comes out clean and dry and not gooey. Let the cake cool for a while before you upturn it onto your serving dish. 
     While the bar is still in one piece, use a knife and graze it down the length of the bar to get thin chocolate flakes. Repeat this process till you have enough flakes to cover the top of the cake. Keep the flakes aside. For the ganache, break the chocolate into smaller pieces and keep them in a glass bowl. Simply heat the cream on a pan till it is boiling and pour it on the chocolate pieces and add in the butter and stir till you get a glossy liquid. Leave it to cool slightly and then pour it over the cooled cake, top it off with chocolate flakes and you are done. The ganache sets into a soft layer of chocolate so if you want to have it slightly fudgy, you can either leave it on the counter top for an hour or refrigerate it before you serve it.

Thursday, 11 August 2011

My guest post at twopotsandapan.ca

Guest Post – Peppermint Meringues by Niveditha Rao

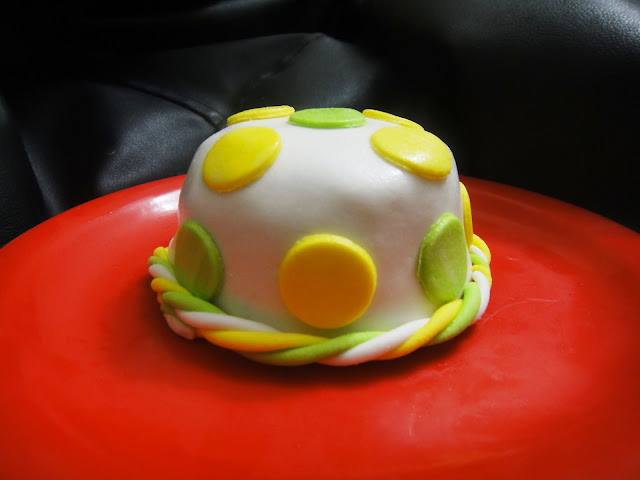
The Polka Dot Princess cakes


I've always been fascinated with fondant. A white blanket that swaddles cakes of all sizes, making everything look as pretty as a snow covered garden. However, fondant isn't available off the shelves here and the lazy me always thought it was too much effort to make it from scratch. After watching a week's worth of Fabulous Cakes on TLC, I took the bull by its horns and decided it was time to attack the beast. 


The lazy bug in me, decided to go in for the easier to make marshmallow fondant vs the more authentic but long process of making fondant using glucose, gelatin, corn syrup and what not. All I needed for this recipe was marshmallows and icing sugar. If you  live in India, you know that marshmallows, aren't available off the shelf, so after hunting away at Spencers, Spar and other haunts, eureka, it hit me, Sweet World at popular malls here sells marshmallows. So off I went to their store, the only grown up 'kid' nevertheless, asking the bewildered attendant for only white marshmallows from the pink and white lot. He must have surely thought I'd lost it. After all, for a person eating marshmallows, it hardly matters what colour it is, does it? Regardless, I stood there while he picked and chose the white ones and a happy puppy I was, anticipating the pretty fondant patterns in my head.


Armed with my bag of marshmallows, I set to experiment and much to the amusement of my two cats, I did a happy dance in the kitchen when I finally achieved success. So here's the recipe for fondant and the mini princess cakes..


Polka Dot Princess Cakes 
For the fondant, you will need:
100 grams white marshmallows
1 tablespoon water
3 cups Icing sugar (confectioners sugar)
A few drops of glycerin


Method:
Place the Marshmallows in a large microwavable bowl, ensuring that there's enough space for the marshmallows to rise when they heat up. They often double up in volume when heating up. Add the water and heat them in your microwave for a minute. Take them out, even though they look puffed but not melted, they are. Use a silicone spatula and mix them so that all the water is incorporated. Give it a good whisk till all the bits and pieces are melted well. Add in a cup of icing sugar and begin to mix. The marshmallow mixture will slowly adhere to the icing sugar and it will soon thicken, starting to get harder to mix. After most of it has been incorporated, dust your work surface with icing sugar, put the mixture on it and adding the rest of the icing sugar gradually, begin to knead everything together. The mixture will be extremely sticky at this stage, but it will get better as you knead it in with the rest of the icing sugar. As a rule of thumb, do not add all the icing sugar, making sure to gradually add in only how much is necessary. You might need more or lesser than what the recipe calls for based on the humidity levels in your location. If your dough is too wet, add more icing sugar and if its too dry, add a few drops of water at a time and knead it again. It also helps to knead in a couple of drops of glycerin just to aid the softness of the dough. When the dough isn't sticky anymore, roll it into a ball, cover with cling film twice and store on your counter top if using it within a day or two (depending on how cool the weather is) or store it in your fridge, getting the dough to room temperature before kneading and rolling it. 


For the cakes, head to my senior from college, Aparna's website for this super easy egg-less microwave cake - Apycooking.
I used 3 small bowls instead of one big bowl and substituted the vanilla essence for peppermint essence, my fav. 


For the Buttercream frosting you will need: 
150 grams unsalted butter (softened)
1 cup icing sugar
2 plus 1 tablespoons milk
1 teaspoon vanilla essence


Method:
Whisk the butter, icing sugar, essence and 1 teaspoon milk till it is smooth. Keep aside 3 to 4 spoonfuls of the frosting in another bowl, add the rest of the milk to this mixture to make a thinner frosting, you will need this for the crumb coating of the cake. Once the mini cakes have cooled completely, slice them into halves and fill them with the thick buttercream icing and sandwiching them back together.


Buttercream-filled cake
After this, you need to use the thinner frosting to crumb coat the entire cakes. This is basically a very thin layer that seals in all the stray crumbs so that the cake is smooth when the fondant or the top layer of buttercream is spread on the cake. Using a flat butter knife, cover the cake with a thin layer. Don't worry if the cake is seen through this layer.


Crumb-coated cake
Pop the crumb-coated cakes into the fridge and let it chill till the frosting is hard and dry. While this happens, knead your fondant till its soft and pliable. If you are using different colours, divide the fondant into smaller balls, place them on your work surface that has cling film on it, add in the colour and knead individually till the colours are incorporated completely. Make sure to have gloves on, otherwise you'll end up having a rainbow fondant mixture. Roll out the white fondant (I used the good old desi chapati belan :p ) till it is about half an inch thick and double the diameter of the cake you want to roll it onto. I measure the length and breadth of the cake and that is the size I want my fondant to be rolled into. Keep dusting the roller and work surface with icing sugar as the dough tends to stick while rolling. Once done, place it over the cake and quickly smooth it out and shape the edges, pressing in as you move downwards. Smooth in the base with the back of a spoon and cut off the excess portions with a pizza cutter. This is how it will look after being covered in white fondant. 


Snow white wrapped in fondant
It looks pretty as it is, but if you want to decorate it further, roll out your coloured strips of fondant and cut our shapes and patterns you desire. Simply wet the portions you want to decorate the cake with and attach the coloured shapes. I used simple polka dots for two of my cakes and they do make a pretty sight. For the third, I cut coloured strips and alternated them on the cake.


 As you can see, the base isn't the neatest at times, so decorating them is necessary. You can decorate them with small balls of different colours if you like. A word of caution, this is tedious if you are doing this alone. Luckily, I had hubby walk in from work at this opportune moment and I dragged him into the kitchen to help me with them :p. Don't worry if they are all not even in size, they are too small to be judged by a perfectionist's eyes :)


Or you can roll out strips of different colours, place them in a row and then twirl them together to get this twisted fondant pattern and attach them to the base with a little water:


There you have it, a perfectly decorated set of mini cakes to make any day special. Two people can easily polish off these mini cakes, but if you do want to store them, do so in an airtight container. But be warned, these babies won't last long, especially if you have kids at home or a sweet tooth like me :)


How it all began

The auspicious boiling of the milk for a new home and the inauguration of my hob

I've never been fond of cooking, my family will vouch for that wholeheartedly. In fact, they all know, or should I say knew me as the lil brat who would never enter the kitchen. I know some would've probably worried away, pondering the fate of my poor future husband who would have to twiddle his thumbs while waiting for the pizza guy to deliver his food :) Why, my mom has often remarked that she would have to find me a chef for a husband and that way at least someone would cook at home :)


Cut short to me finally taking that step and marrying, not a chef thankfully, for I'd have never ventured into the kitchen then :p, I sublimely feasted on my mother in law's yummy cooking whilst she began to do the age old wondering carried forth from my parents of "Will this girl ever step into the kitchen."  


Step into the kitchen she did, when she moved into her own home. Even though I have my mother in law living just a floor above me, least to say, I couldn't knock on her door for food everyday now, could I. I had dabbled in a few desserts while I lived with her, but having to manage a home all by myself, without having that comforting sense of something yum ready in the kitchen for you prompted me to befriend my oven and my new hob (hubby dearest must have fervently prayed that his shiny gift to me would result in something good cooking on it :p)


I started off with a bang and the freedom of baking and cooking without someone looking over my shoulder or fear of what the more experienced cooks at home would say to disasters made me realise, baking/cooking wasn't the monster that I made it out to be. Turns out I can bake :). Credit to my Coorg genes somewhere for making me a decent baker, not to forget me making ga ga eyes at my aunt and mom mixing cake batter while I waited impatiently to lick the batter off the bowl and looked in fascination at the makings of a Pineapple Upside Down Cake. Aah the miracle that was baking to my 7-year old mind.


So about a year later, I still don't have the confidence to call myself a great cook, but encouragement from family and friends to share my recipes and a Polka Dot Princess cake cake that finally made me say "This is gonna start off my blog' made me come out with my food blog. (The Polka Dot Princess cake will make her appearance in my next entry, don't you worry :) ) 


So here's to my venture. Hope you like my recipes and do leave your comments, good, bad or ugly. Remember, I ain't no expert, so be easy on me :)